Cloudflare Workers + Hono ワークショップ
資料はこちら => workshops.yusuke.run
#serverlessdays
- Yusuke Wada
- 2023-09-24 ServerlessDays Tokyo 2023
- workshops.yusuke.run
アジェンダ
- ワークショップについて
- Workers イントロダクション
- Hono イントロダクション
- 基本編
- プロキシ編
- Web API編
- フルスタック編
- AI編
- Honoをより深く知る
- その他
1. ワークショップについて
1.1 対象
対象者
- Cloudflareでのアプリケーション作成に興味のある方
- Honoを使ってみたい方
- フロント、バックエンド問いません
前提条件
- Wranglerが動く環境をつくっておく
npx wranglerが動く- JavaScriptに対する知識があるとよい
1.2 自己紹介
自己紹介
- 和田裕介
- 2023年4月〜 Developer Advocate @ Cloudflare
- ボケて co-founder
- Creator of Hono
- https://x.com/yusukebe
- https://github.com/yusukebe
Developer Relations チーム
- Emerging Technologies & Incubation 所属
- Manager, Developer Advocate x 3, Community Manager x 2
- NY, Austin, Amsterdam, Lisbon, SF, Tokyo
時差すごい

やってること
- Honoの開発
- チュートリアルの作成
- イベント登壇
- イベント開催
- ワークショップ講師
- 頑張っています
2. Workers イントロダクション
2.1 Cloudflare Workers/Pagesについて
- Cloudflareのエッジで実行されるサーバーレス環境
Cloudflare Workers
Build serverless applications and deploy instantly across the globe for exceptional performance, reliability, and scale.
サーバーレスアプリケーションを構築し、卓越したパフォーマンス、信頼性、スケールのために世界中に即座にデプロイします。
https://developers.cloudflare.com/workers/
Cloudflare Pages
Deploy dynamic front-end applications in record time.
動的なフロントエンド・アプリケーションを記録的な速さで展開。
https://developers.cloudflare.com/pages/
2.2 Cloudflare Workers
- 設定、メンテ必要なしのサーバーレス環境を提供
- Cloudflareのエッジに即座にデプロイされる
- フリープランでだいぶ遊べる
- Workers Playground
Cloudflare Workersの思想

- Cloudflare Workersのご紹介:エッジでJavaScript Service Workersを実行する
- 2017年9月の記事
- Cloudflareのエッジをプログラム可能にする
- 検討した結果JavaScriptに行き着く
- V8を採用、複数のユーザーのスクリプトを安全に実行
- Service Worker APIを採用、ブラウザ用だが実はエッジにも適している
- Web APIとして賢く設計されている
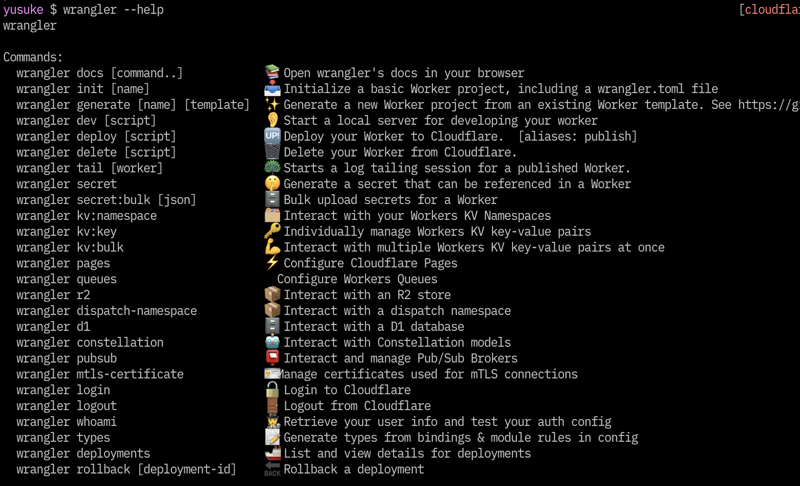
Wrangler
- WorkersのためのCLI
- Workersプロジェクトの作成、テスト、デプロイ
- Pagesでも使用
- Bindingsの管理や
tailなども
2.3 Bindings
CloudflareのリソースとWorkersを結ぶ
- KV
- Durable Objects
- R2
- D1
- Service Bindings
- Queue
- Constellation
- など
KV
- 素朴なAPIを備えたKey-Value store
- アクセスされたらキャッシュされる
- キャッシュされると静的ファイルのように速い
- Workers sites (非推奨) もKVでできてる
- 書き込み後の反映に60秒かかることもある
- How KV works
Durable Objects
- 同時に書き込み、トランザクション
- 強整合性
- チャットなど、リアルアイム、動的コンテンツ
- D1やR2はこの上に構築されている
- KVは静的コンテンツや設定、DOは動的な状態管理
- Cloudflare Durable Objects
R2
- ストレージサービス
- データエグレスが無料
- AWS S3のAPIと互換性がある
- フロントにWorkersを置くことができる
- Cloudflare R2
D1
- Workers、Pagesから利用可能なSQLデータベース
- オープンアルファ
- SQLiteがDOで動いている
- Cloudflare D1
Service Bindings
- Workers間の通信処理を可能にする
- Publicなインターネットを経由しない
- Workersでマイクロサービスを作る
- Service bindings
Queue
- メッセージの送受信が可能
- オープンベータ
queueで受け取り- Cloudflare Queues
- 自ドメインのカスタムメールアドレスを使用
- 受信したメールを受信ボックスへルーティング
emailで受け取り- Cloudflare Email Routing
Constellation
- ベータ
- Workersで機械学習モデルを動かす
- 予め学習済みのデータを使用
- Constellation
2.4 Cloudflare Pages
- フルスタックアプリケーション用
- 各種フレームワークが動く
- FunctionsでWorkersが動く
- Cloudflare Pages
2.5 Workersを知るために
リソース
2.6 その他のエッジで実行されるプラットフォーム
- Fastly Compute@Edge
- AWS CloudFront Functions
- AWS Lambda@Edge
- Deno Deploy
- Vercel Edge Functions
- Netlify Functions
- Lagon
- その他
3. Hono イントロダクション
3.1 Honoとは?
副題
Ultrafast framework for the Edges
もしくは
The Web Framework built on Web Standards
Lightweight, Ultrafast, Web Standards
軽量で、速くて、Web標準を使っている
3.2 ユースケース
- Web APIの作成
- バックエンドサーバーのプロキシ
- CDNのフロント
- エッジアプリケーション
- ライブラリのベースサーバー
- フルスタックアプリ
3.3 どこで使われているか?
主に4つのプラットフォーム
- Cloudflare Workers
- Fastly Compute@Edge
- Deno
- Bun
Cloudflare Workers
- cdnjs API Server
- Drivly
- repeat.dev
- drizzle-orm - Examples
- Cloudflare 公式ドキュメント、チュートリアル
- Cloudflare Workers SDK
- Cloudflare社内
Fastly Compute@Edge
Deno
- Deno本体
- Deno Docs
- Deno Benchmarks
- Ultra
Bun

- https://www.youtube.com/watch?v=BsnCpESUEqM&t=358s
Awesome Hono
Honoを使うべきか?
ベンチマーク
3.4 5つの特徴
- 速い 🚀 - RegExpRouterはマジで速い。リニアにルーティングしません。
- 軽量 🪶 -
hono/tinyプリセットは12kB。HonoはWeb Standard APIのみを使っていて依存0。 - マルチランタイム 🌍 - Cloudflare Workers, Fastly Compute@Edge, Deno, Bun, Lagon, AWS Lambda, or Node.js。同じコードが全てのランタイム/プラットフォームで動きます。
- 揃っている 🔋 - Honoにはビルトインミドルウェア、カスタムミドルウェア、3rdパーティミドルウェアがあります。やりたいことが揃っています。
- 楽しいDX 🛠️ - 綺麗なAPI。そしてTypeScriptのサポート。そう型があるのです。
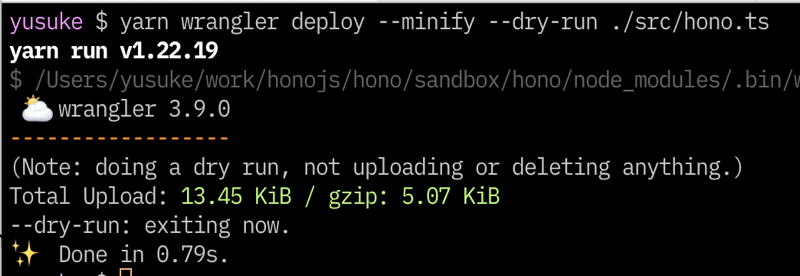
3.5 速い
- 5つのルーターを備えている
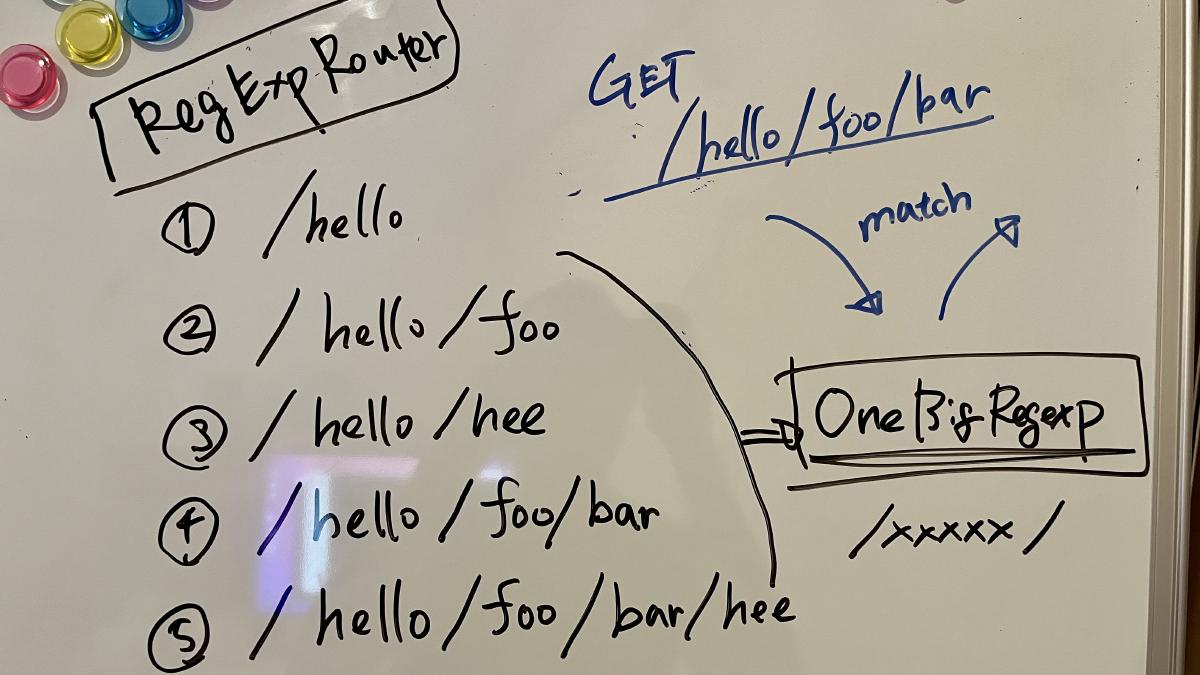
- RegExpRouter - ルーティングをひとつの大きな正規表現にする。JavaScript界でほぼ最速
- TriRouter - Trie木を利用。リファレンス実装
- SmartRouter - 登録されたルーターの中から最適なルーターを自動的に選ぶ
- LinearRouter - 登録が最速
- PatternRouter - 一番サイズが小さい。1.3KB
RegExpRouter
- RegExpRouterは「RegExp」といってもExpressなどで使われているpath-to-regexpとは違う
- path-to-regexpはリニアにマッチさせるので、ルートごとに正規表現が走る
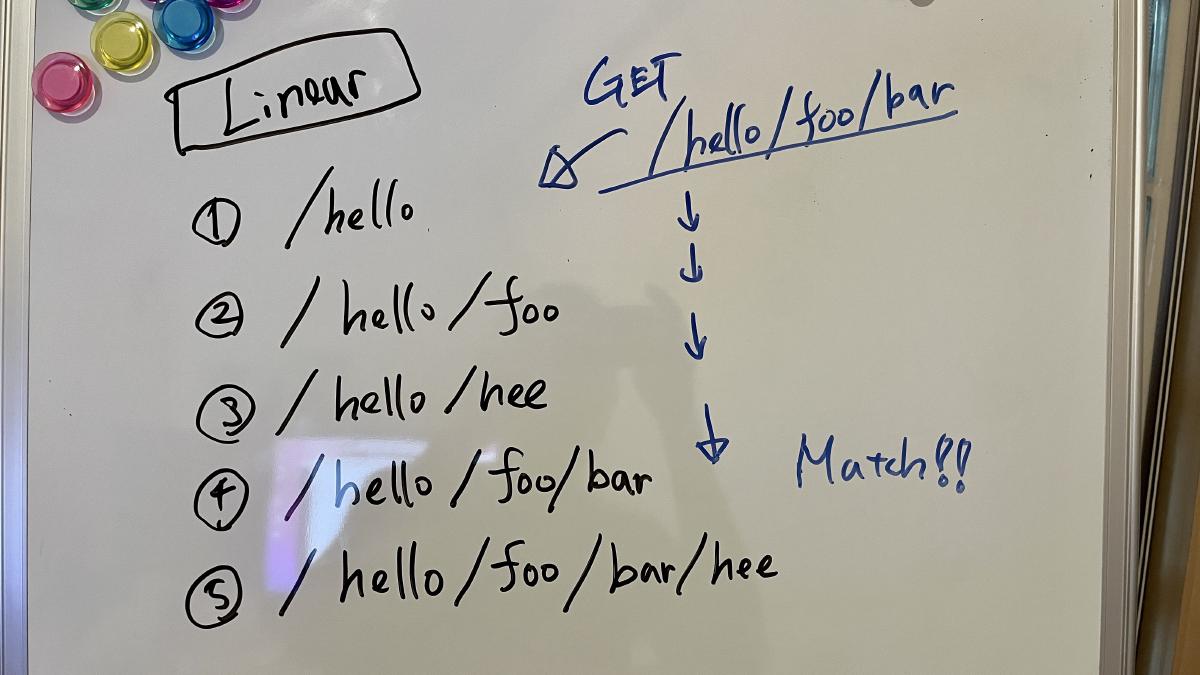
- RegExpRouterは予め一つの大きな正規表現を作り一度でマッチさせる
TriRouter
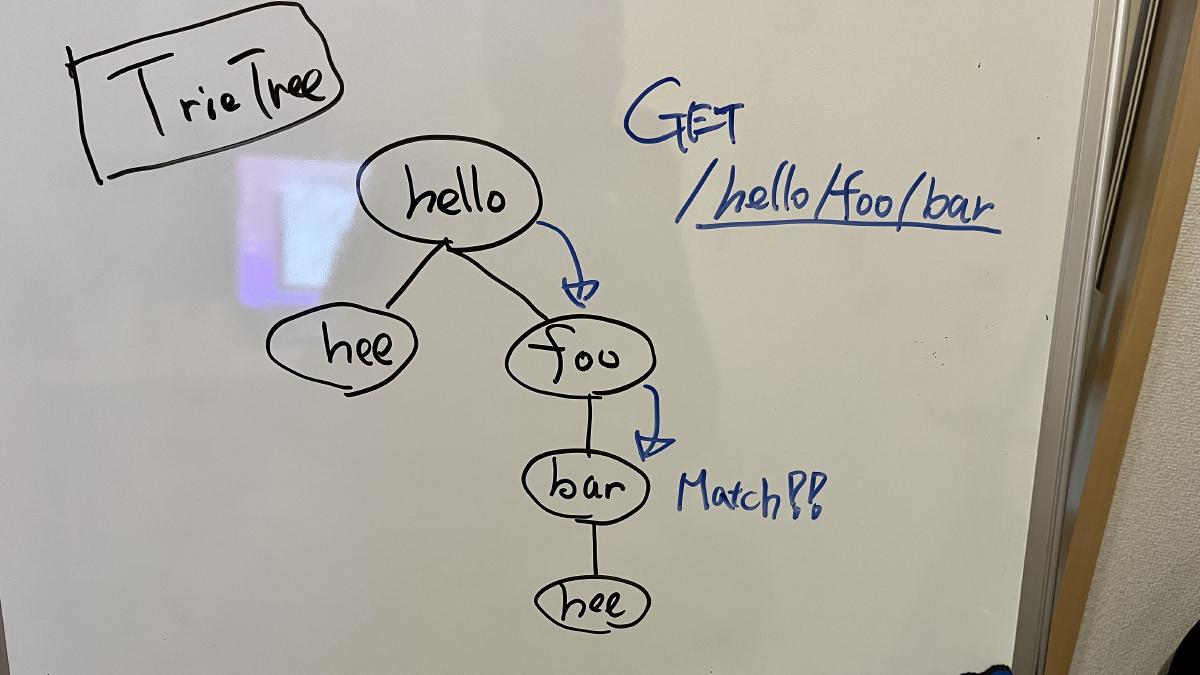
- Trie木の構造を使ったルーター
- リニアにマッチさせるより速いが、Honoのルーティングの都合上、一般的な木構造のルーターと比べると遅い
- このルーターを正とする、リファレンス実装になっている
SmartRouter
- 複数のルーターを登録しておくと、そのアプリケーションに最適なルーターを選んでそれを使い続ける
readonly defaultRouter: Router = new SmartRouter({
  routers: [new RegExpRouter(), new TrieRouter()],
})
LinearRouter
- 登録が速い
• GET /user/lookup/username/hey
----------------------------------------------------- -----------------------------
LinearRouter     1.82 µs/iter      (1.7 µs … 2.04 µs)   1.84 µs   2.04 µs   2.04 µs
MedleyRouter     4.44 µs/iter     (4.34 µs … 4.54 µs)   4.48 µs   4.54 µs   4.54 µs
FindMyWay       60.36 µs/iter      (45.5 µs … 1.9 ms)  59.88 µs  78.13 µs  82.92 µs
KoaTreeRouter    3.81 µs/iter     (3.73 µs … 3.87 µs)   3.84 µs   3.87 µs   3.87 µs
TrekRouter       5.84 µs/iter     (5.75 µs … 6.04 µs)   5.86 µs   6.04 µs   6.04 µs

summary for GET /user/lookup/username/hey
  LinearRouter
   2.1x faster than KoaTreeRouter
   2.45x faster than MedleyRouter
   3.21x faster than TrekRouter
   33.24x faster than FindMyWay
PatternRouter
- とにかく小さい
ベンチマーク
- https://github.com/honojs/hono/tree/main/benchmarks/routers
対象のルーター
- find-my-way
- express
- koa-router
- koa-tree-router
- trek-router
- @medley/router
- Memoirist
- Hono RegExpRouter
- Hono TrieRouter
結果
• all together
---------------------------------------------------------------------------- -----------------------------
Hono RegExpRouter                      460.6 ns/iter (429.69 ns … 525.88 ns)  479.5 ns 520.63 ns 525.88 ns
Hono TrieRouter                         1.52 µs/iter     (1.39 µs … 1.73 µs)   1.56 µs   1.73 µs   1.73 µs
@medley/router                        618.21 ns/iter (591.08 ns … 764.25 ns) 636.08 ns 764.25 ns 764.25 ns
find-my-way                           959.15 ns/iter   (892.79 ns … 1.02 µs) 979.02 ns   1.02 µs   1.02 µs
koa-tree-router                       926.79 ns/iter   (866.17 ns … 1.04 µs) 943.57 ns   1.04 µs   1.04 µs
trek-router                             1.76 µs/iter     (1.69 µs … 1.84 µs)   1.79 µs   1.84 µs   1.84 µs
express (WARNING: includes handling)    4.02 µs/iter      (3.9 µs … 4.33 µs)   4.06 µs   4.33 µs   4.33 µs
koa-router                              1.39 µs/iter     (1.34 µs … 1.57 µs)   1.41 µs   1.57 µs   1.57 µs
radix3                                763.26 ns/iter (734.77 ns … 902.52 ns)  781.2 ns 902.52 ns 902.52 ns
Memoirist                             540.11 ns/iter (507.38 ns … 699.65 ns) 554.52 ns 697.25 ns 699.65 ns

summary for all together
  Hono RegExpRouter
   1.17x faster than Memoirist
   1.34x faster than @medley/router
   1.66x faster than radix3
   2.01x faster than koa-tree-router
   2.08x faster than find-my-way
   3.02x faster than koa-router
   3.3x faster than Hono TrieRouter
   3.82x faster than trek-router
   8.74x faster than express (WARNING: includes handling)
@usualomaさん
RegExpRouter, SmartRouter, LinearRouter, PatternRouterは @usualomaさん が作りました。 @usualomaさんが発表した資料が参考になります。
3.6 軽量
- 標準で21KB、PatternRouterで13KB
- ちなみにExpressは572KB
- Web StandardのAPIのみを使っていて、外部のライブラリへの依存が0。
プリセット
あらかじめ、おすすめのルーターのセッティングをプリセットとして提供している。
hono: ほとんどのユースケースでオススメです。ルーティング登録がhono/quickより遅いとはいえ、一度登録されれば高いパフォーマンスを発揮します。DenoやBun、それにNode.jsなどを使った常駐型のサーバーには最適です。また、Cloudflare WorkersやDeno Deploy、Lagonでもこのプリセットを使えばいいでしょう。というのもこれらのようなv8 isolateを使った環境では、isolateは起動後しばらく行き続けるからです(時間が決まっていたり、メモリなどの状況に応じて変化したりします)。
hono/quick: このプリセットはリクエストのたびにアプリケーションが初期化されるような環境に適しています。Fastly Compute@Edgeはこれに従うので、このプリセットを使うといいでしょう。
hono/tiny: このプリセットは一番ファイルサイズの小さいプリセットです。リソースが限られている環境にはいいでしょう。
3.7 どこでも動く
Web Standard APIs
- Web標準のAPIのみを使用
- Node.jsアダプターはNode.jsのincoming/outgoingをRequest/Responseに変換している
- WinterCGをフォローしている
最低限のコード
export default {
  async fetch() {
    return new Response('Hello World')
  },
}
よく使うAPI
RequestResponseURLURLSearchParamsHeadersFormData- Web API | MDN
面白いAPI
URLPattern- これを利用してルーターを作った
- yusukebe/pico: Ultra-tiny router for Cloudflare Workers and Deno
- path-to-regexpと似た実装
- Bunにはない
スターターのテンプレートは12種類
- aws-lambda
- bun
- cloudflare-pages
- cloudflare-workers
- deno
- fastly
- lagon
- lambda-edge
- netlify
- nextjs
- nodejs
- vercel
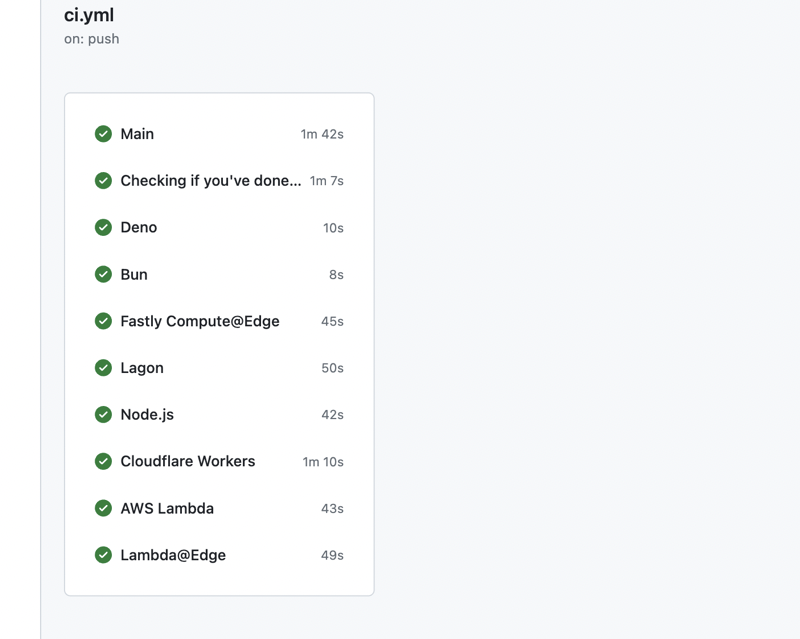
CIでは9種類のランタイムのテストが走る
エントリポイントが違うだけ
Cloudflare Workers & Bun
import { Hono } from 'hono'
const app = new Hono()

app.get('/', (c) => c.text('Hello Hono!'))

export default app
Fastly Compute@Edge
import { Hono } from 'hono'
const app = new Hono()

app.get('/', (c) => c.text('Hello Hono!'))

app.fire()
Deno
import { Hono } from 'https://deno.land/x/hono@vv3.7.1/mod.ts'

const app = new Hono()

app.get('/', (c) => c.text('Hello Hono!'))

Deno.serve(app.fetch)
Lagon
import { Hono } from 'hono'
const app = new Hono()

app.get('/', (c) => c.text('Hello Hono!'))

export const handler = app.fetch
Cloudflare Pages
import { Hono } from 'hono'
import { handle } from 'hono/cloudflare-pages'

const app = new Hono()

app.get('/', (c) => c.text('Hello Hono!'))

export const onRequest = handle(app)
Vercel
import { Hono } from 'hono'
import { handle } from 'hono/vercel'

export const config = {
  runtime: 'edge',
}

const app = new Hono()

app.get('/', (c) => c.text('Hello Hono!'))

export default handle(app)
Netlify
import { handle } from 'https://deno.land/x/hono@v3.7.1/adapter/netlify/mod.ts'
import { Hono } from 'https://deno.land/x/hono@v3.7.1/mod.ts'

const app = new Hono()

app.get('/', (c) => c.text('Hello Hono!'))

export default handle(app)
AWS Lambda
import { Hono } from 'hono'
import { handle } from 'hono/aws-lambda'

const app = new Hono()

app.get('/', (c) => c.text('Hello Hono!'))

export const handler = handle(app)
Lambda@Edge
import { Hono } from 'hono'
import { handle } from 'hono/lambda-edge'

const app = new Hono()

app.get('/', (c) => c.text('Hello Hono!'))

export const handler = handle(app)
Node.js
import { serve } from '@hono/node-server'
import { Hono } from 'hono'

const app = new Hono()

app.get('/', (c) => c.text('Hello Hono!'))

serve(app)
3.8 揃っている
コアは小さいが、ミドルウェアとヘルパーがある。
ミドルウェア
Responseを返すものを「ハンドラ」と呼んでいる- その前後に実行され、
RequestとResponseを扱うのがミドルウェア
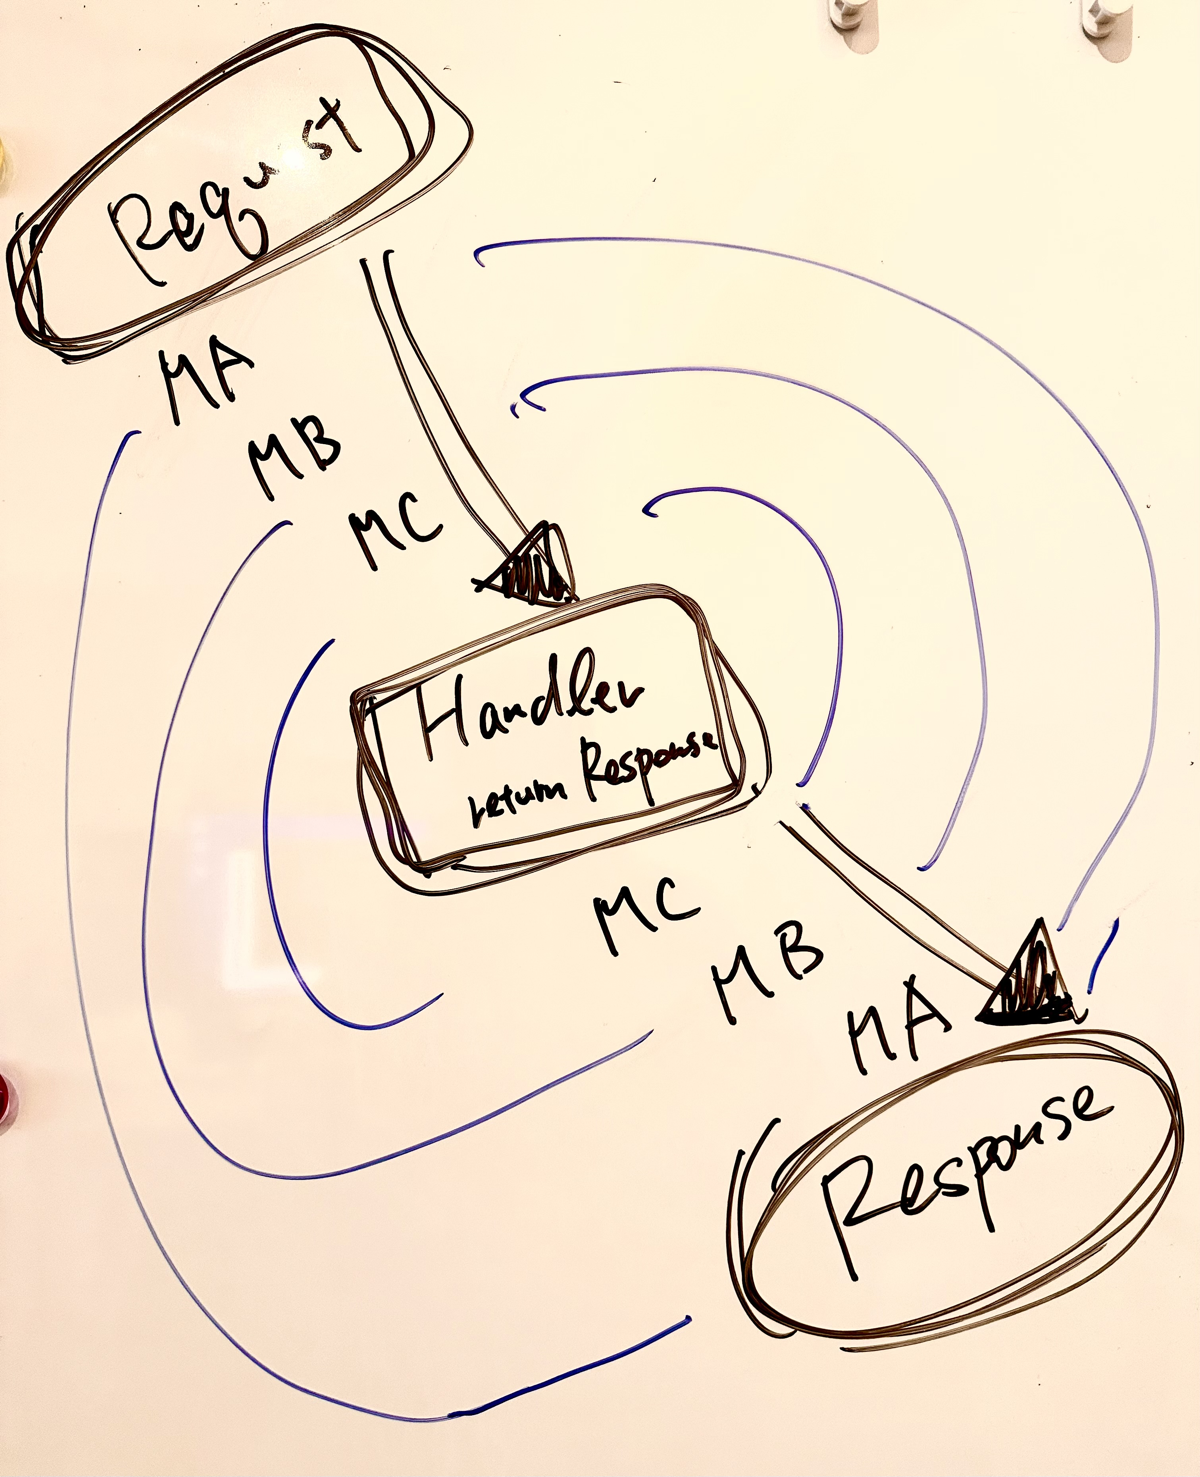
- Honoのアプリを構成するのはミドルウェアとハンドラだけ
3つのミドルウェア
- ビルトインミドルウェア、3rdパーティミドルウェア、カスタムミドルウェアがある
ミドルウェアとヘルパーの例
- Basic Authentication
- Bearer Authentication
- Cache
- Compress
- Cookie
- CORS
- ETag
- html
- JSX
- JWT Authentication
- Logger
- Pretty JSON
- Secure Headers
- GraphQL Server
- Firebase Authentication
- Sentry
- Others!
カスタムミドルウェア
X-Response-Timeヘッダを付与するミドルウェア
app.use('*', async (c, next) => {
  const start = Date.now()
  await next()
  const end = Date.now()
  c.res.headers.set('X-Response-Time', `${end - start}`)
})
JSX
- 組み込みのJSXが使える
import type { FC } from 'hono/jsx'

const app = new Hono()

const Layout: FC = (props) => {
  return (
    <html>
      <body>{props.children}</body>
    </html>
  )
}

const Top: FC<{ messages: string[] }> = (props: { messages: string[] }) => {
  return (
    <Layout>
      <h1>Hello Hono!</h1>
      <ul>
        {props.messages.map((message) => {
          return <li>{message}!!</li>
        })}
      </ul>
    </Layout>
  )
}

app.get('/', (c) => {
  const messages = ['Good Morning', 'Good Evening', 'Good Night']
  return c.html(<Top messages={messages} />)
})
3.8 楽しいDX
TypeScript
- HonoではアプリケーションをTypeScriptで書くことを推奨している
- Cloudflare Workers、Deno、BunはTSからJSへのトランスパイルを意識する必要がない

RPC
- サーバー側の型を共有し、クライアントでも利用することでType-Safeにする
- tRPCよりカジュアルに使える
- Zod、Zod Validator、
hcを使ったスタックがある
APIを書く
import { Hono } from 'hono'

const app = new Hono()

app.get('/hello', (c) => {
  return c.json({
    message: `Hello!`,
  })
})
Zodでバリデーションをする
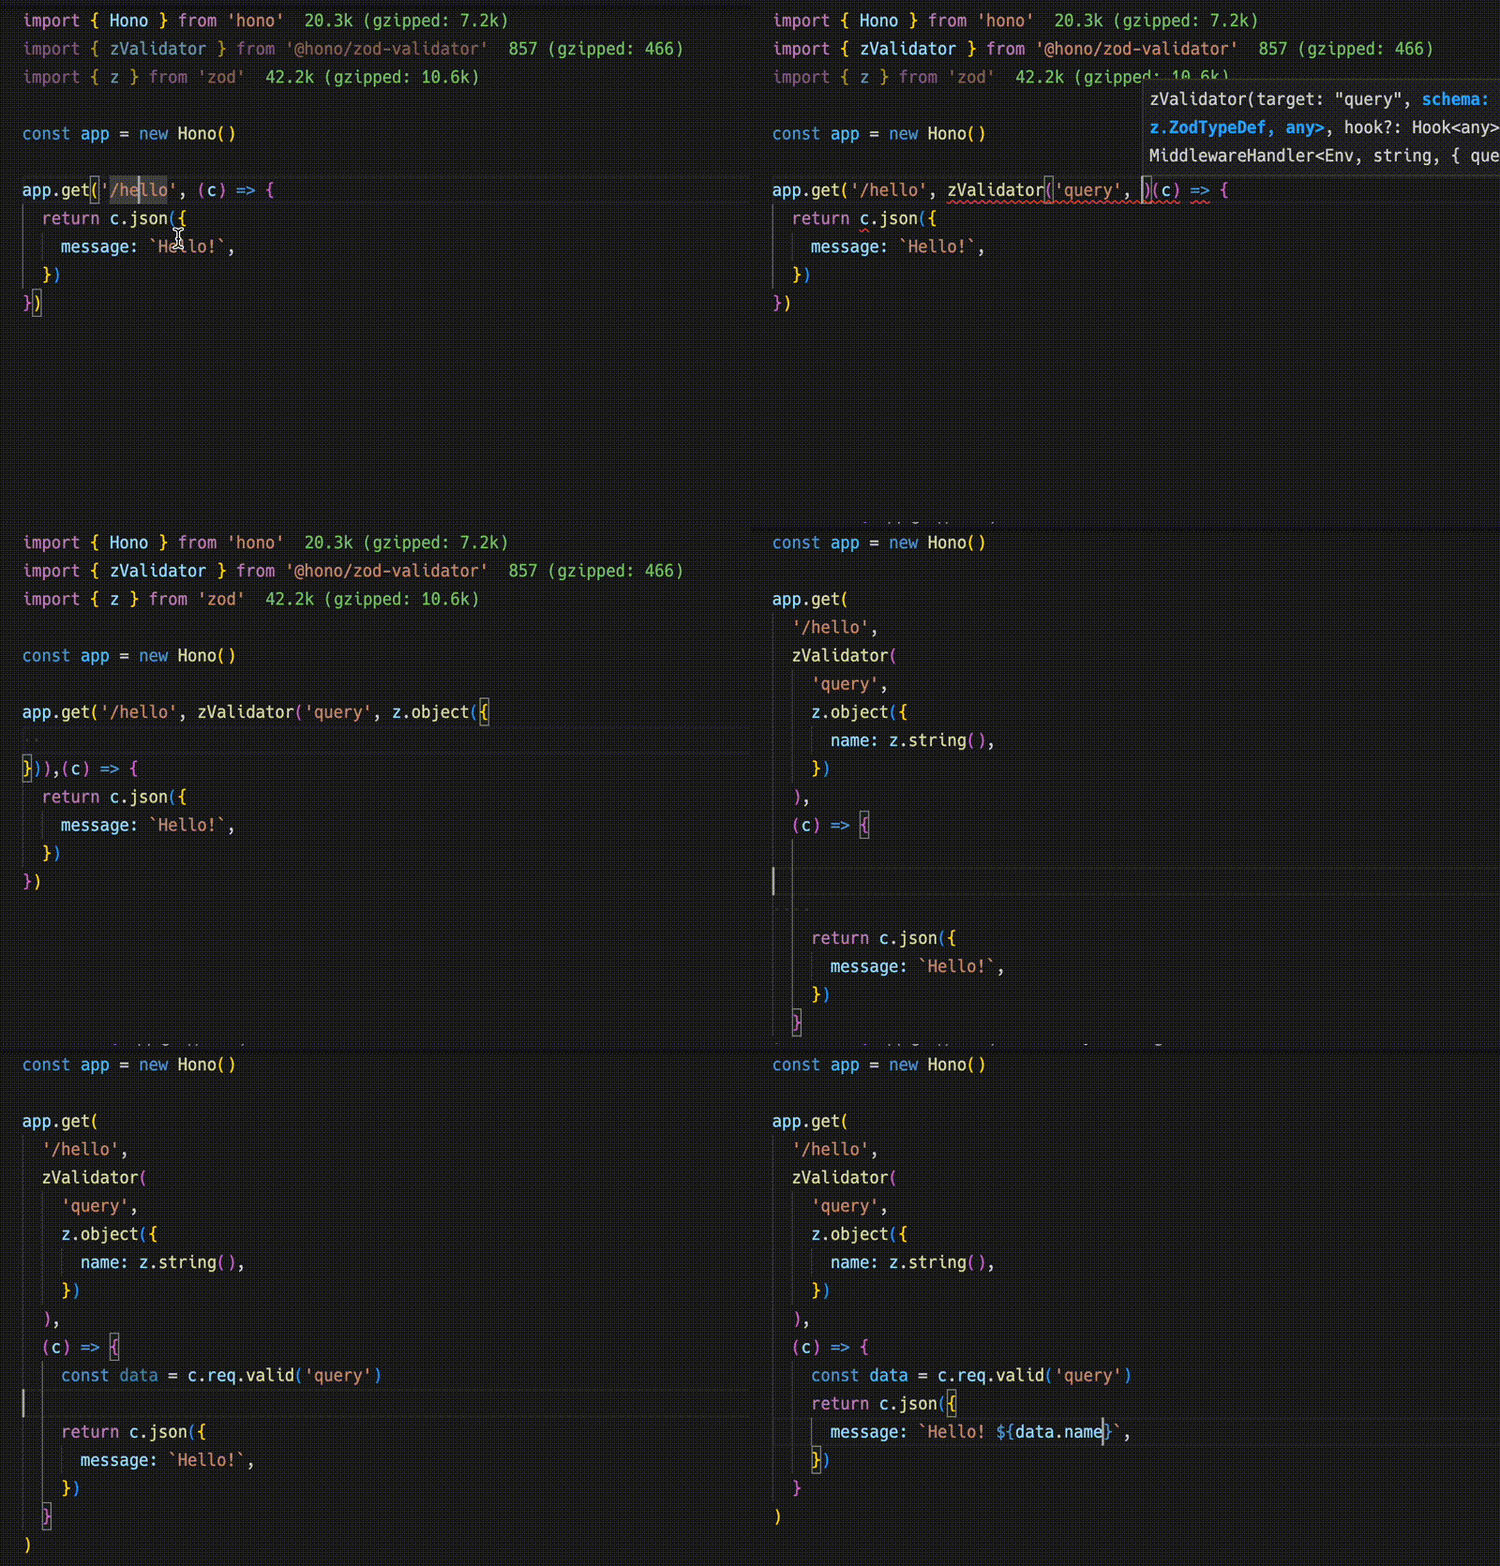
import { zValidator } from '@hono/zod-validator'
import { z } from 'zod'

app.get(
  '/hello',
  zValidator(
    'query',
    z.object({
      name: z.string(),
    })
  ),
  (c) => {
    const { name } = c.req.valid('query')
    return c.json({
      message: `Hello! ${name}`,
    })
  }
)
型を共有する
c.json()をc.jsonT()にする- 返り値の型をとる
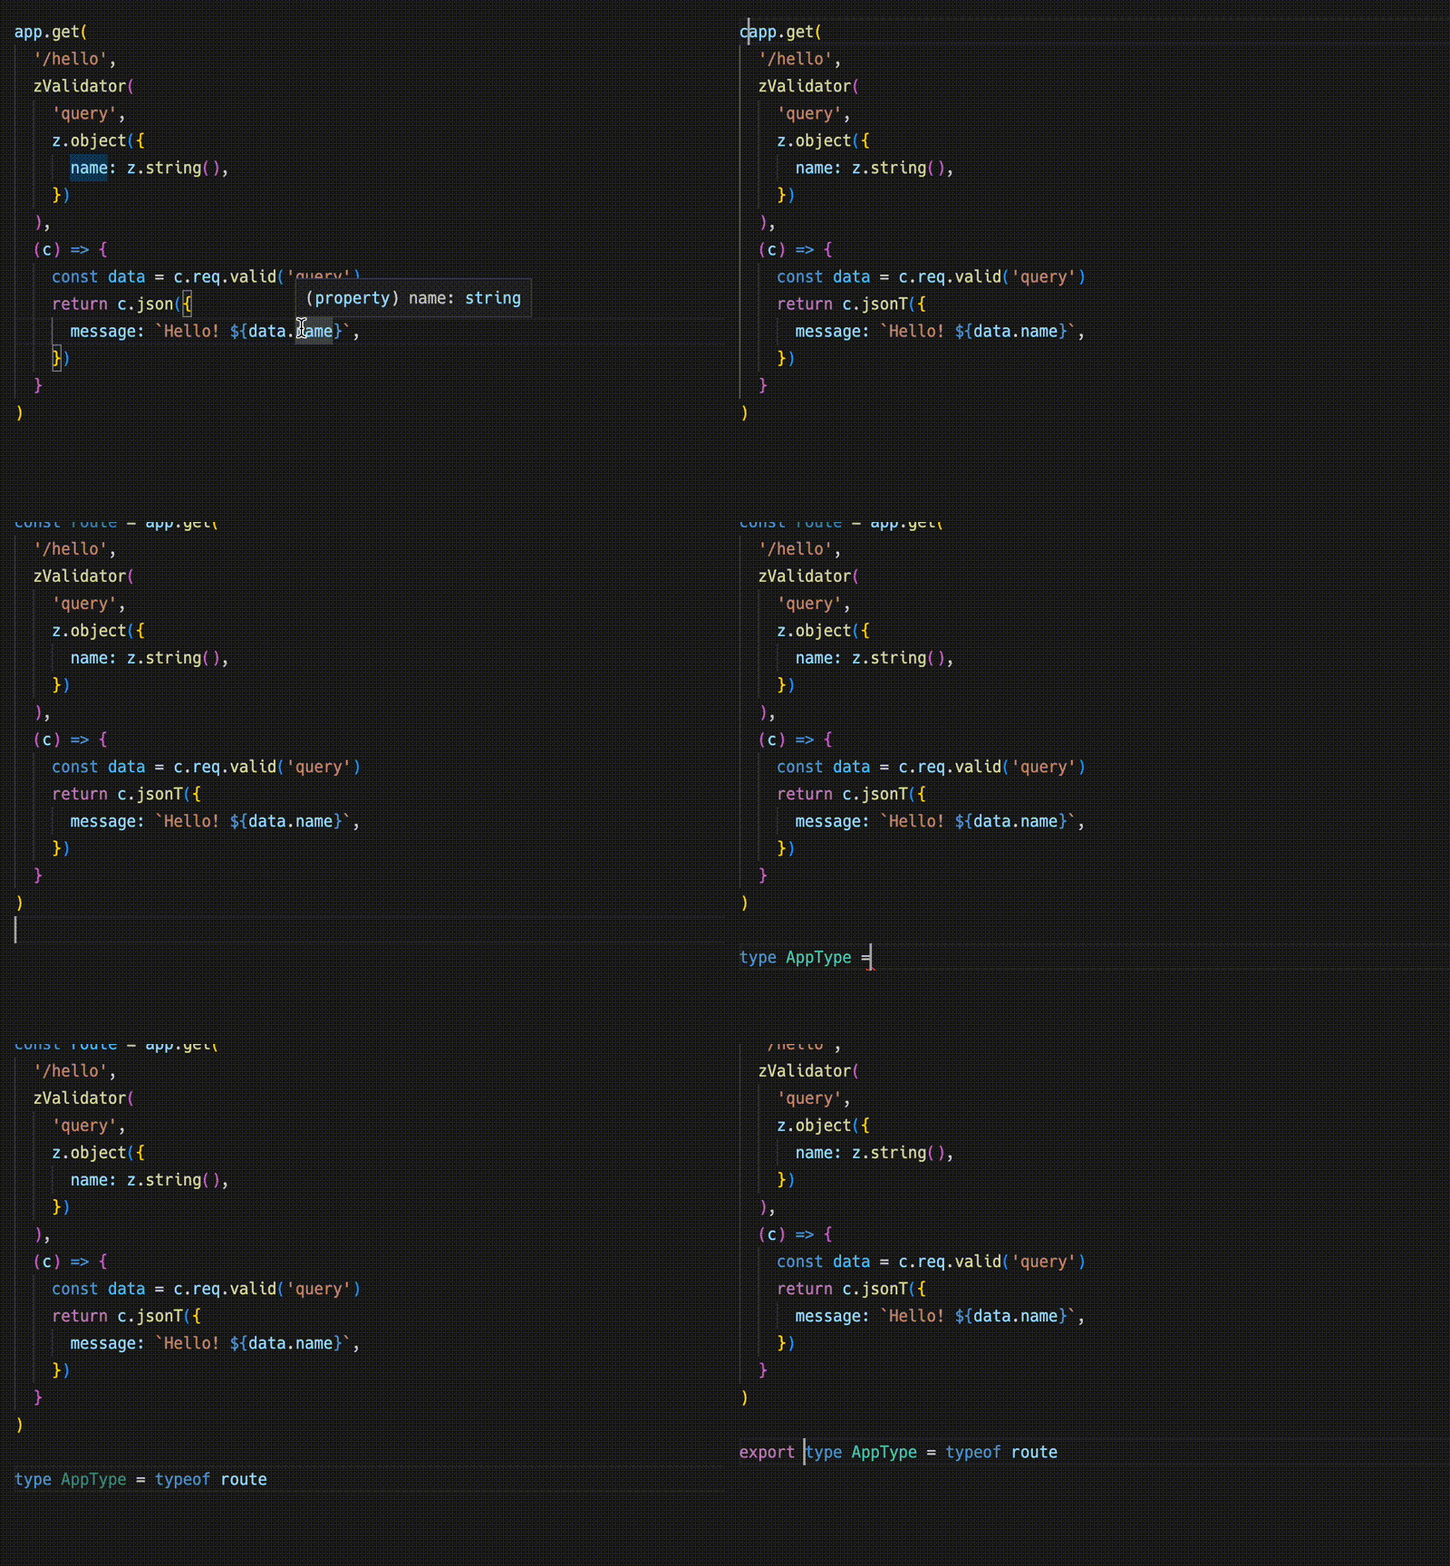
const route = app.get(
  '/hello',
  zValidator(
    'query',
    z.object({
      name: z.string(),
    })
  ),
  (c) => {
    const { name } = c.req.valid('query')
    return c.jsonT({
      message: `Hello! ${name}`,
    })
  }
)

export type AppType = typeof route
クライアントの実装
hc()でクライアントの作成- サーバーからの型をジェネリクスで渡す
- URLのパスとリクエストのパラメータの補完が効く
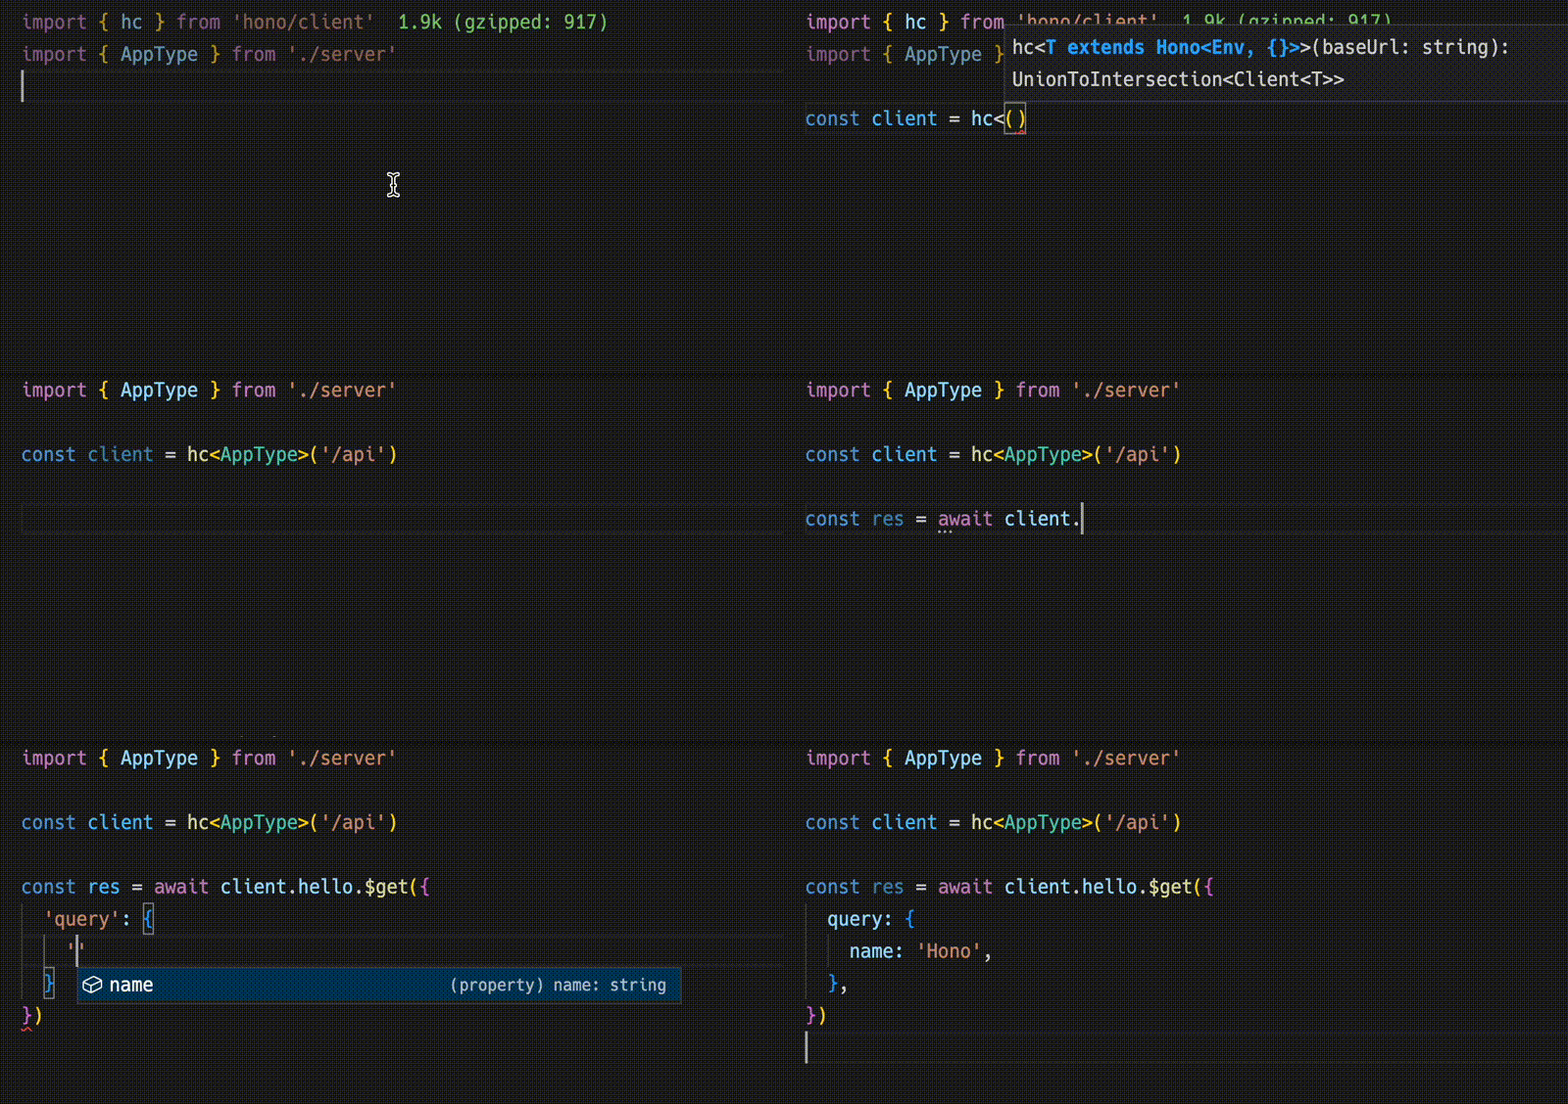
import { AppType } from './server'
import { hc } from 'hono/client'

const client = hc<AppType>('/api')
const res = await client.hello.$get({
  query: {
    name: 'Hono',
  },
})
- レスポンスは
Responseオブジェクトなのでそのまま使える - ただし、
json()で取り出したオブジェクトには型がつく
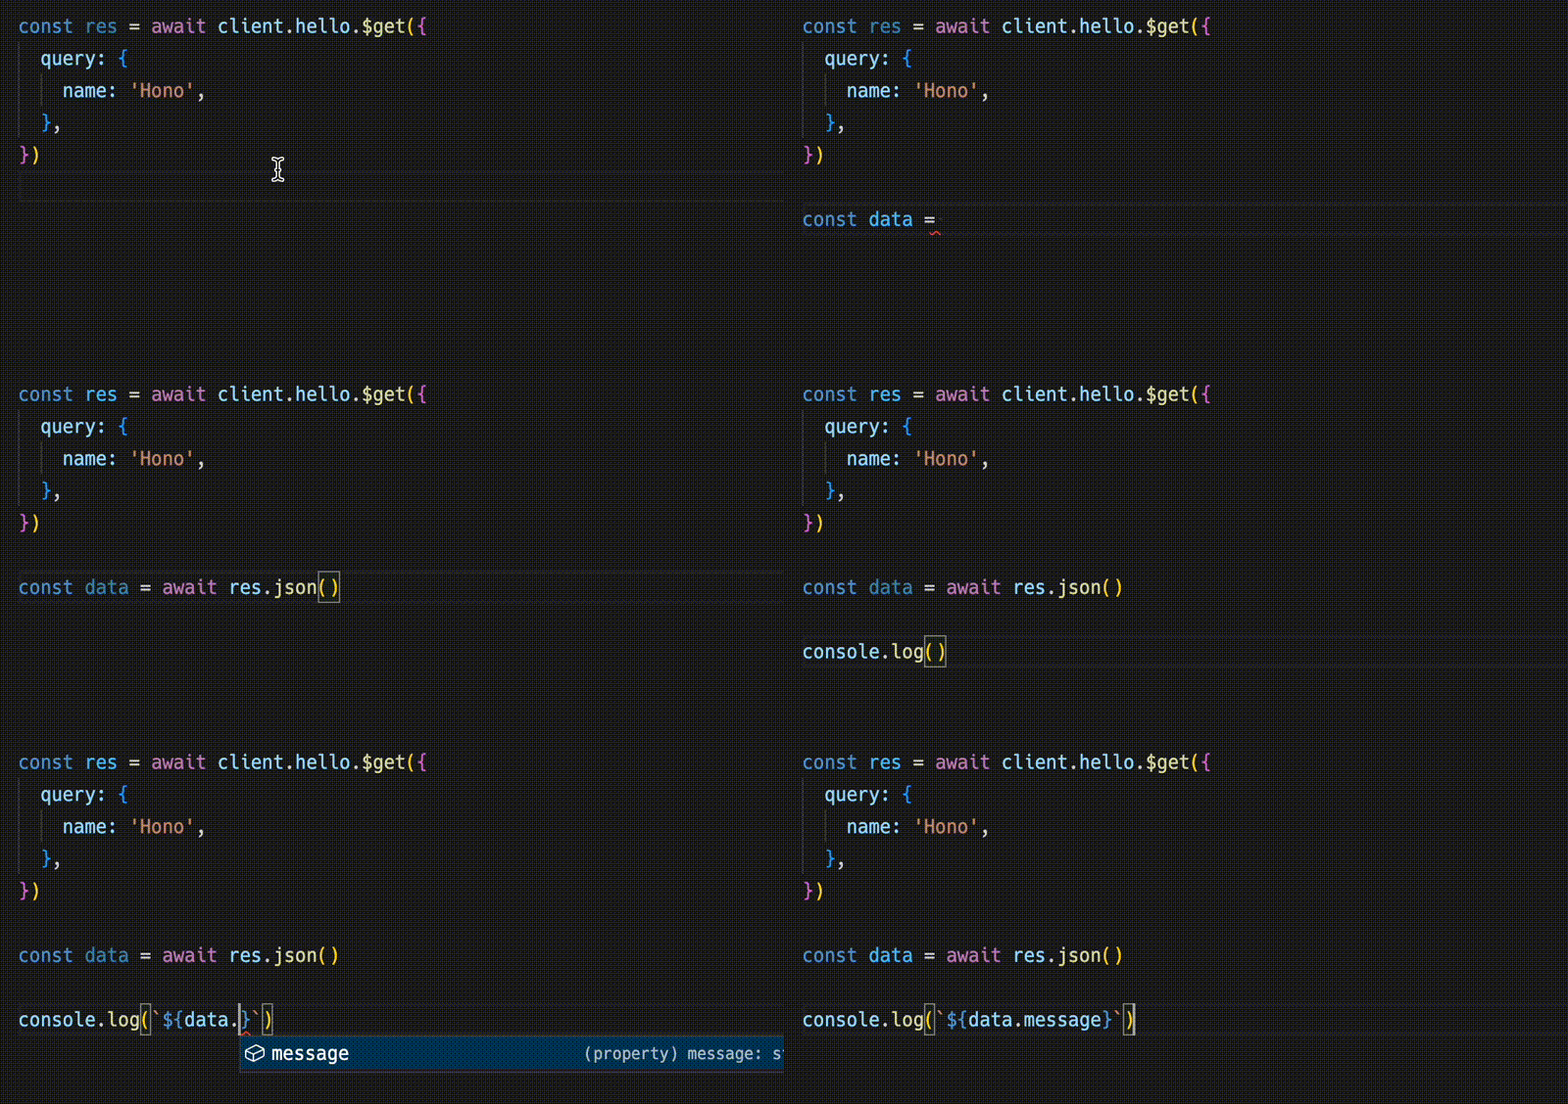
const data = await res.json()
console.log(`${data.message}`)
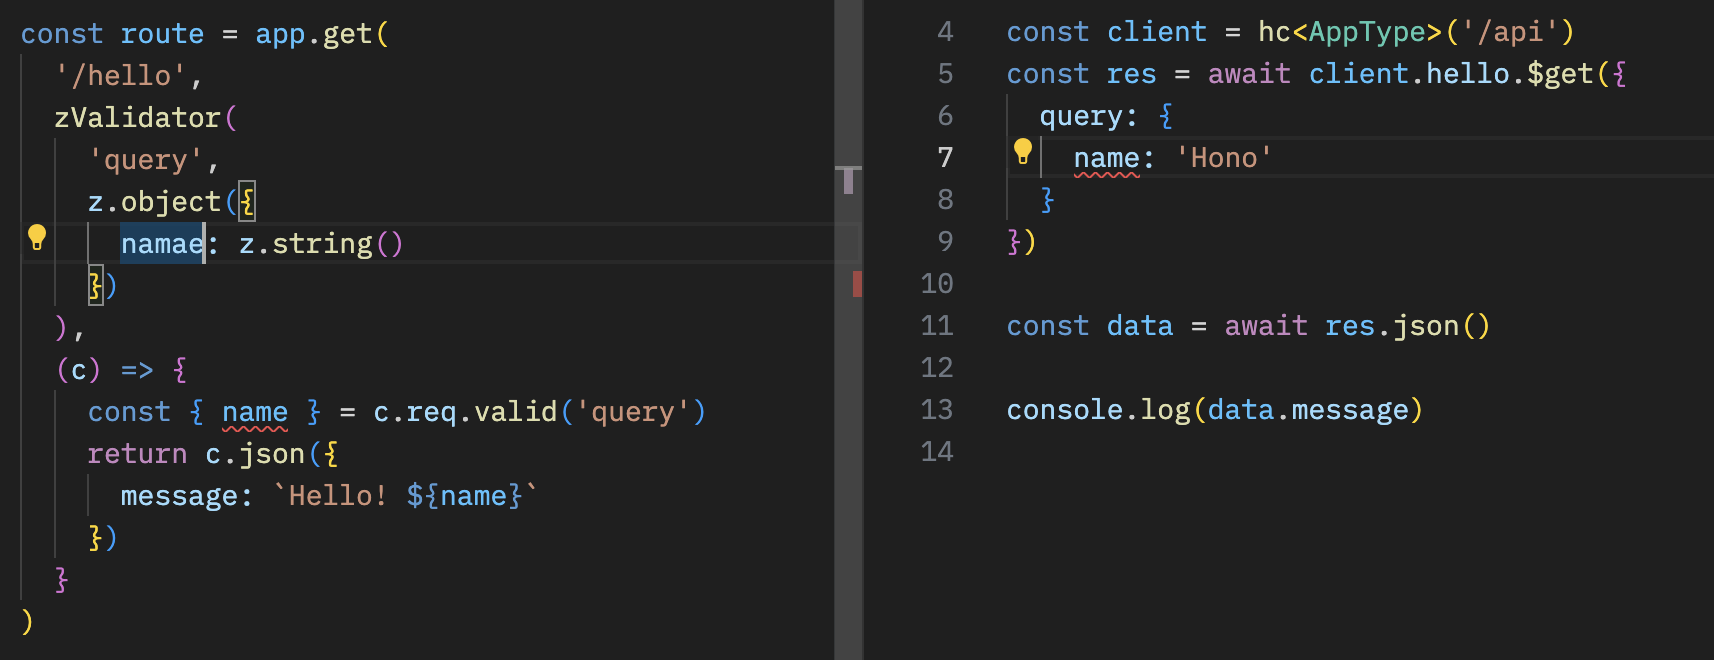
- APIの型を共有することで、サーバーサイドの変化をクライアントで気づくことになる
テスト
- テストが簡単に書ける
describe('Example', () => {
  test('GET /posts', async () => {
    const res = await app.request('/posts')
    expect(res.status).toBe(200)
    expect(await res.text()).toBe('Many posts')
  })
})
- Testing Helperで
hcが使える
import { testClient } from 'hono/testing'

it('test', async() => {
  const app = new Hono().get('/search', (c) => c.jsonT({ hello: 'world' }))
  const res = await testClient(app).search.$get()

  expect(await res.json()).toEqual({ hello: 'world' })
})
3.10 Cloudflare + Hono を使ったアプリ例
r2-image-worker

4. 基本編
4.1 初めてのCloudflare Workers
C3を使う
- Create Cloudflare CLI
npm create cloudflare@latest

Or

yarn create cloudflare

Or

pnpm create cloudflare@latest

Or

bun create cloudflare
"Hello World" Worker
package.json
{
  "name": "curly-leaf-e7ce",
  "version": "0.0.0",
  "private": true,
  "scripts": {
    "deploy": "wrangler deploy",
    "start": "wrangler dev"
  },
  "devDependencies": {
    "@cloudflare/workers-types": "^4.20230419.0",
    "typescript": "^5.0.4",
    "wrangler": "^3.0.0"
  }
}
src/index.ts
export interface Env {}

// ExportedHandler
export default {
  async fetch(request: Request, env: Env, ctx: ExecutionContext): Promise<Response> {
    return new Response('Hello World!')
  },
}
fetchの引数
request-Requestオブジェクトenv- Bindingsの名前と値のレコードctx-ExecutionContext、つまりwaitUntil()とpassThroughOnException()
Workersアプリの流れ
- Requestを受け取る
- ロジック
- Responseを作る
- Responseを返す
waitUntil()
export default {
  async fetch(_req, _env, ctx) {
    const log = async () => console.log('Foo')
    ctx.waitUntil(log())
    return new Response('Hello')
  },
} as ExportedHandler
4.2 初めてのHono
create hono
npm create hono@latest

Or

yarn create hono

Or

pnpm create hono@latest

Or

bun create hono
レスポンスを返す
app.get('/', (c) => {
  return c.text('Hello!')
})

app.get('/json', (c) => {
  return c.json({
    message: 'Hello!',
  })
})

app.get('/html', (c) => {
  return c.json({
    message: '<h1>Hello!</h1>',
  })
})

app.get('/stream', (c) => {
  return c.streamText(async (stream) => {
    stream.sleep(1000)
    stream.writeln('Hello!')
  })
})
Contextを通してレスポンスを作る
app.get('/welcome', (c) => {
  // Set headers
  c.header('X-Message', 'Hello!')
  c.header('Content-Type', 'text/plain')

  // Set HTTP status code
  c.status(201)

  // Return the response body
  return c.body('Thank you for coming')
})
以下と同じ
new Response('Thank you for coming', {
  status: 201,
  headers: {
    'X-Message': 'Hello',
    'Content-Type': 'text/plain',
  },
})
その他
c.notFound()c.redirect()
ルーティング
// HTTP Methods
app.get('/', (c) => c.text('GET /'))
app.post('/', (c) => c.text('POST /'))
app.put('/', (c) => c.text('PUT /'))
app.delete('/', (c) => c.text('DELETE /'))

// Wildcard
app.get('/wild/*/card', (c) => {
  return c.text('GET /wild/*/card')
})

// Any HTTP methods
app.all('/hello', (c) => c.text('Any Method /hello'))

// Custom HTTP method
app.on('PURGE', '/cache', (c) => c.text('PURGE Method /cache'))

// Multiple Method
app.on(['PUT', 'DELETE'], '/post', (c) => c.text('PUT or DELETE /post'))

// Path parameters
app.get('/user/:name', (c) => {
  const name = c.req.param('name')
  ...
})

// Optional parameters
// Will match `/api/animal` and `/api/animal/:type`
app.get('/api/animal/:type?', (c) => c.text('Animal!'))

// Regexp
app.get('/post/:date{[0-9]+}/:title{[a-z]+}', (c) => {
  const { date, title } = c.req.param()
  ...
})

// Including a slash
app.get('/posts/:filename{.+.png$}', (c) => {
  //...
})

// Chained routes
app
  .get('/endpoint', (c) => {
    return c.text('GET /endpoint')
  })
  .post((c) => {
    return c.text('POST /endpoint')
  })
  .delete((c) => {
    return c.text('DELETE /endpoint')
  })
ルートを分ける
const book = new Hono()

book.get('/', (c) => c.text('List Books')) // GET /book
book.get('/:id', (c) => {
  // GET /book/:id
  const id = c.req.param('id')
  return c.text('Get Book: ' + id)
})
book.post('/', (c) => c.text('Create Book')) // POST /book

const app = new Hono()
app.route('/book', book)
ホスト名でのルーティング
const app = new Hono({
  getPath: (req) => req.url.replace(/^https?:\/(.+?)$/, '$1'),
})

app.get('/www1.example.com/hello', (c) => c.text('hello www1'))
app.get('/www2.example.com/hello', (c) => c.text('hello www2'))
Context
Bindingsの取得
// Environment object for Cloudflare Workers
app.get('*', async c => {
  const counter = c.env.COUNTER
  ...
})
c.set() / c.get()
app.use('*', async (c, next) => {
  c.set('message', 'Hono is cool!!')
  await next()
})

app.get('/', (c) => {
  const message = c.get('message')
  return c.text(`The message is "${message}"`)
})
Variableをappへ渡すことで型がつく
type Variables = {
  message: string
}

const app = new Hono<{ Variables: Variables }>()
c.var
c.set()でセットした変数へアクセスできる
const result = c.var.client.oneMethod()
その他
c.executionCtxc.eventc.error
HonoRequest
param()query()queries()header()parseBody()json()text()arrayBuffer()valid()pathurlmethodraw
5. プロキシ編
レスポンスヘッダの追加
import { Hono } from 'hono'

const app = new Hono()

app.all('*', async (c) => {
  const res = await fetch(c.req.raw)
  const newResponse = new Response(res.body, res)
  newResponse.headers.set('X-Custom', 'Foo')
  return newResponse
})

export default app
CORS
app.use('/api/*', cors())
app.use(
  '/api2/*',
  cors({
    origin: 'http://example.com',
    allowHeaders: ['X-Custom-Header', 'Upgrade-Insecure-Requests'],
    allowMethods: ['POST', 'GET', 'OPTIONS'],
    exposeHeaders: ['Content-Length', 'X-Kuma-Revision'],
    maxAge: 600,
    credentials: true,
  })
)
Basic認証
app.use(
  '/auth/*',
  basicAuth({
    username: 'yourname',
    password: 'yoursecret',
  })
)
CloudflareのBindingsの変数を使う場合
app.use('/auth/*', async (c, next) => {
  const auth = basicAuth({
    username: c.env.USERNAME,
    password: c.env.PASSWORD,
  })
  return auth(c, next)
})
認証は以下のミドルウェアがある
- Basic認証
- Bearer認証
- JWT認証
リダイレクト
app.get('/old/:id', async (c) => {
  const id = c.req.param('id')
  return c.redirect(`/new/${id}`)
})
オリジンの振り分け
const imageHost = 'http://imagehost'
const fontHost = 'http://fonthost'

app.get('/assets/:type{(?:images|fonts)}/:filename', async (c) => {
  const { type, filename } = c.req.param()
  const hostName = type === 'images' ? imageHost : fontHost
  const url = new URL(`/${filename}`, hostName)
  return fetch(url)
})
キャッシュ
app.get(
  '/assets/*',
  cache({
    cacheName: 'my-app',
  })
)
デバイス別の挙動変更
app.get('/pages/*', async (c) => {
  let isMobile = false
  const userAgent = c.req.header('User-Agent') || ''

  if (userAgent.match(/(iPhone|iPod|Android|Mobile)/)) {
    isMobile = true
  }

  const cache = caches.default

  const device = isMobile ? 'Mobile' : 'Desktop'
  const cacheKey = c.req.url + '-' + device

  let response = await cache.match(cacheKey)

  if (!response) {
    response = await fetch(c.req.raw)
    response = new Response(response.body, response)
    response.headers.append('Cache-Control', 's-maxage=3600')
    c.executionCtx.waitUntil(cache.put(cacheKey, response.clone()))
  }

  return response
})
HTMLタグの置換
HTMLRewriterを使う
app.get('/pages/*', async (c) => {
  const OLD_URL = 'oldhost'
  const NEW_URL = 'newhost'

  class AttributeRewriter {
    constructor(attributeName) {
      this.attributeName = attributeName
    }
    element(element) {
      const attribute = element.getAttribute(this.attributeName)
      if (attribute) {
        element.setAttribute(this.attributeName,
	  attribute.replace(OLD_URL, NEW_URL))
      }
    }
  }

  const rewriter = new HTMLRewriter().on('a', new AttributeRewriter('href'))

  const res = await fetch(c.req.raw)
  const contentType = res.headers.get('Content-Type')

  if (contentType.startsWith('text/html')) {
    return rewriter.transform(res)
  } else {
    return res
  }
})
その他
- ホットリンク禁止
- 103 Early Hints
- 動的コンテンツのキャッシュ
- Cloudflare Workersプロキシパターン
6. Web API編
以下基本をやる
- JSONを返す
- 変数を扱う
- D1を使ってみよう
- ロジック
- テストする
- バリデーション
6.1 Blog APIをつくってみよう
雛形をダウンロード
npx degit yusukebe/cloudflare-workshop-examples/projects/starter-web-api starter-web-api
ディレクトリ構成
$ tree ./
./
├── blog.sql
├── package.json
├── src
│   └── index.ts
├── test
│   └── index.test.ts
├── tsconfig.json
├── vitest.config.ts
└── wrangler.sample.toml
D1の設定
wrangler d1 create blog
wrangler d1 execute blog --local --file ./blog.sql
wrangler d1 execute blog --local --command "INSERT INTO posts(id,title,content) VALUES('1','Hello','Nice day!')"
wrangler d1 execute blog --local --command "SELECT * FROM posts"
wrangler.toml
name = "blog"
compatibility_date = "2023-01-01"

[[d1_databases]]
binding = "DB"
database_name = "blog"
database_id = ""

# [vars]
# MY_VARIABLE = "production_value"

# [[kv_namespaces]]
# binding = "MY_KV_NAMESPACE"
# id = "xxxxxxxxxxxxxxxxxxxxxxxxxxxxxxxx"

# [[r2_buckets]]
# binding = "MY_BUCKET"
# bucket_name = "my-bucket"
CREATE TABLE posts (
  id TEXT PRIMARY KEY,
  created_at TEXT DEFAULT (datetime('now')),
  title TEXT,
  content TEXT
);
npm i zod @hono/zod-validator
共通で使う型
import { z } from 'zod'

const schema = z.object({
  title: z.string().min(1),
  content: z.string().min(1),
})

export type Bindings = {
  DB: D1Database
}
export type Post = z.infer<typeof schema> & {
  created_at: string
  id: string
}
GET /postsの実装
const { results } = await c.env.DB.prepare(
  'SELECT * FROM posts ORDER BY created_at DESC;'
).all<Post>()
- Bindingsへは
c.env.DBでアクセス allへPost型をジェネリクスで渡す
POST /postsの実装
Zod Validatorを使う
import { zValidator } from '@hono/zod-validator'
// ...
app.post('/posts', zValidator('form', schema), async (c) => {
  const { title, content } = c.req.valid('form')
  // ...
})
UUIDの生成
const id = crypto.randomUUID()
Insertの実行
const { success } = await c.env.DB.prepare(
  'INSERT INTO posts(id, title, content) values (?, ?, ?)'
)
  .bind(id, title, content)
  .run()
デプロイ
npm run deploy
実際はWranglerを実行している
wrangler deploy --minify src/index.ts
7. フルスタック編
- Pages
- Pagesの仕組みについて
- JSX
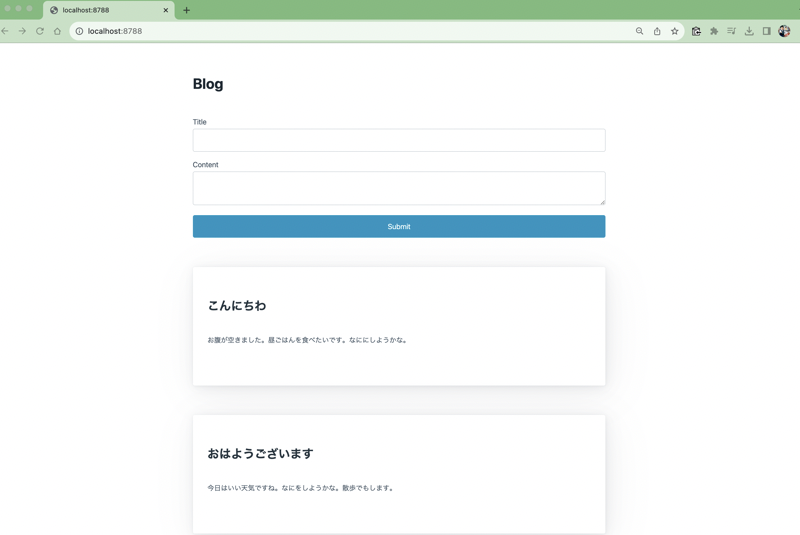
7.1 BlogのUIもつくってみよう
完成形
雛形のダウンロード
npx degit yusukebe/cloudflare-workshop-examples/projects/starter-pages pages
ディレクトリ構造
$ tree .
.
├── front
│   ├── App.tsx // Reactアプリ
│   └── main.tsx // クライントのエントリポイント
├── index.html // エントリポイント
├── package.json
├── tsconfig.json
├── vite.config.ts
└── wrangler.sample.toml
プロキシさせてViteを使う
wrangler pages dev --compatibility-date=2023-01-01 -- vite
Functionsを使う
// functions/api/[[route]].ts
import { Hono } from 'hono'
import { handle } from 'hono/cloudflare-pages'
import app from '../../server'

const main = new Hono()
main.route('/api', app)

export const onRequest = handle(main)
RPCモードを使う
// front/App.tsx
const client = hc<AppType>('/api')
const res = await client.posts.$get()
const { posts } = await res.json()
setPosts(posts)
7.2 SSRでつくってみよう
完成品のダウンロード
npx degit yusukebe/cloudflare-workshop-examples/projects/ssr ssr
7.3 R2画像アップローダーをつくってみよう
完成品のダウンロード
npx degit yusukebe/image-tag image-tag
ディレクトリ構成
tree .
.
├── .dev.vars
├── .gitignore
├── README.md
├── package.json
├── schema.sql
├── src
│   ├── index.tsx
│   └── renderer.ts
├── tsconfig.json
└── wrangler.toml
R2のバケットをつくる
npx wrangler r2 bucket create image-tag
D1のデータベースをつくる
スキーマ
CREATE TABLE images (
  id TEXT PRIMARY KEY,
  created_at TEXT DEFAULT (datetime('now')),
  tag TEXT
);
実行
npx wrangler d1 create image-tag
npx wrangler d1 execute image-tag --local --file=./schema.sql
シークレットのつくり方
ローカルでは.dev.varsに値を入れる
BASIC_AUTH_USERNAME=foo
BASIC_AUTH_PASSWORD=bar
リモートではダッシュボードからやる
TSX
mv src/index.ts src/.index.tsx
src/renderer.ts
import { Context } from 'hono'
import { html } from 'hono/html'

export const renderer = (c: Context) => (content: string) => {
  return c.html(html`<!DOCTYPE html>
    <html lang="en">
      <head>
        <meta charset="utf-8" />
        <meta name="viewport" content="width=device-width, initial-scale=1.0" />
        <link rel="stylesheet" href="https://cdn.jsdelivr.net/npm/@picocss/pico@1/css/pico.min.css" />
      </head>
      <body>
        <main class="container">${content}</main>
      </body>
    </html>`)
}
src/index.ts
Bindings
type Bindings = {
  DB: D1Database
  BUCKET: R2Bucket
  BASIC_AUTH_USERNAME: string
  BASIC_AUTH_PASSWORD: string
}
Image
type Image = {
  id: string
  tag: string
  created_at: string
}
Rendererの登録
app.get('*', async (c, next) => {
  c.setRenderer(renderer(c))
  await next()
})
POST /
const schema = z.object({
  file: z.instanceof(File),
  tag: z.string().min(1)
})

app.post('/', zValidator('form', schema), async (c) => {
  const { file, tag } = c.req.valid('form')
  const id = crypto.randomUUID()
  if (file instanceof File) {
    const data = await file.arrayBuffer()
    const object = await c.env.BUCKET.put(id, data, {
      httpMetadata: {
        contentType: file.type
      }
    })
    if (object) {
      console.log(`${object.key} is uploaded!`)
      const { success } = await c.env.DB.prepare('INSERT INTO images(id,tag) VALUES(?,?)').bind(id, tag).run()
      if (!success) {
        return c.text('Something went wrong', 500)
      }
    }
  }
  return c.redirect('/')
})
GET /file/:fileName
app.get('/file/:fileName', async (c) => {
  const object = await c.env.BUCKET.get(c.req.param('fileName'))
  if (object) {
    c.header('content-type', object.httpMetadata?.contentType)
    return c.body(await object.arrayBuffer())
  }
  return c.notFound()
})
GET /
app.get('/', async (c) => {
  const { results } = await c.env.DB.prepare('SELECT * FROM images ORDER BY created_at DESC').all<Image>()
  const images = results

  return c.render(
    <>
      <h1>Top!</h1>
      <form method="POST" action="/" enctype="multipart/form-data">
        <input type="file" name="file" accept="image/*" />
        <input type="text" name="tag" />
        <button type="submit">Submit</button>
      </form>
      <div>
        {images.map((image) => {
          return (
            <div>
              <h3>{image.tag}</h3>
              <img src={`/file/${image.id}`} />
            </div>
          )
        })}
      </div>
    </>
  )
})
Basic認証のためのミドルウェア
const myBasicAuth = middleware<{
  Bindings: Bindings
}>(async (c, next) => {
  const auth = basicAuth({
    username: c.env.BASIC_AUTH_USERNAME,
    password: c.env.BASIC_AUTH_PASSWORD
  })
  return await auth(c, next)
})
GET /api/random
const querySchema = z.object({
  tag: z.string().min(1)
})

app.get('/api/random', zValidator('query', querySchema), async (c) => {
  const { tag } = c.req.valid('query')
  const { results } = await c.env.DB.prepare('SELECT * FROM images WHERE tag = ? ORDER BY RANDOM() LIMIT 1')
    .bind(tag)
    .all<Image>()
  const images = results
  return c.json(images)
})
デプロイ
image-tagという名前でデプロイしておく
8. AI編
- ChatGPTはOpenAPIに対応する => Zod OpenAPI
- ChatGPTのStreamingを扱う =>
c.streamText()
8.1 ChatGPTのPluginをつくってみよう
完成形
完成品のダウンロード
npx degit yusukebe/cloudflare-workshop-examples/projects/ssr ssr
ディレクトリ構造
$ tree .
.
├── package.json
├── src
│   ├── ai-plugin.ts
│   ├── index.ts
│   └── routes.ts
└── tsconfig.json
ドキュメント
APIの定義を書く
自然言語で書けばよい
// src/ai-plugin.ts
// GET /.well-known/ai-plugin.json にマッピングされる
export const aiPluginJson = {
  schema_version: 'v1',
  name_for_human: 'TODO List (No Auth)',
  name_for_model: 'todo',
  description_for_human: 'Manage your TODO list. You can add, remove and view your TODOs.',
  description_for_model:
    'Plugin for managing a TODO list, you can add, remove and view your TODOs.',
  auth: {
    type: 'none',
  },
  api: {
    type: 'openapi',
    url: 'http://localhost:8787/openapi.json',
  },
  logo_url:
    'https://ss.yusukebe.com/a4ebf3360db8e05185b83866352539ff4a587f2df97273258551dbb34c88b792_800x744.png',
  contact_email: 'support@example.com',
  legal_info_url: 'https://example.com/legal',
}
Zod OpenAPI
インストール
@hono/zod-openapi
Routeの定義。Zodを使う
import { z, createRoute } from '@hono/zod-openapi'

const UsernameParamsSchema = z.object({
  username: z.string().openapi({
    description: 'The name of user.',
  }),
})

const routeGetTodos = createRoute({
  method: 'get',
  path: '/todos/{username}',
  operationId: 'getTodos',
  summary: 'Get the list of todos',
  request: {
    params: UsernameParamsSchema,
  },
  responses: {
    '200': {
      description: 'OK',
      content: {
        'application/json': {
          schema: z.object({
            todos: z.array(z.string()).openapi({
              description: 'The list of todos.',
            }),
          }),
        },
      },
    },
  },
})
エンドポイントの実装
app.openapi(routeGetTodos, (c) => {
  const { username } = c.req.valid('param')
  return c.jsonT({
    todos: _TODOS[username],
  })
})
8.2 ChatGPTのGatewayをつくってみよう
完成形
完成品のダウンロード
npx degit yusukebe/cloudflare-workshop-examples/projects/chatgpt-streaming chatgpt-streaming
Sonik
実は開発中のSonikというメタフレームワークを使っている。
- Hono、Vite、UIライブラリを組み合わせたメタフレームワーク
- ファイルベースルーティング
- SSR
- デフォルトでJavaScriptオフ
- Islandハイドレーション
- UIプリセット
- APIアプリを作るのにもおすすめ
- Honoのミドルウェアが使える
- エッジで実行されることを想定
ディレクトリ構造
$ tree .
.
├── app
│   ├── client.ts
│   ├── islands
│   │   └── component.tsx
│   ├── routes
│   │   ├── _404.tsx
│   │   ├── _layout.tsx
│   │   └── index.tsx
│   ├── server.ts
│   └── style.css
├── package.json
├── tsconfig.json
└── vite.config.ts
キモはここ
// app/routes/index.tsx
app.post('/api', async (c) => {
  const body = await c.req.json<{ message: string }>()

  const openai = new OpenAI({ apiKey: c.env.OPENAI_API_KEY })
  const chatStream = await openai.chat.completions.create({
    messages: PROMPT(body.message),
    model: 'gpt-3.5-turbo',
    stream: true,
  })

  return c.streamText(async (stream) => {
    for await (const message of chatStream) {
      await stream.write(message.choices[0]?.delta.content ?? '')
    }
  })
})
8.3 先程のR2と組み合わせたChatGPTのPluginをつくってみよう
完成品のダウンロード
npx degit yusukebe/image-tag image-tag-plugin
ディレクトリ構成
tree .
.
├── .gitignore
├── README.md
├── package.json
├── src
│   ├── ai-plugin.ts
│   ├── index.ts
│   └── routes.ts
├── tsconfig.json
└── wrangler.toml
src/ai-plugin.ts
export const aiPluginJson = (baseURL: string) => {
  return {
    schema_version: 'v1',
    name_for_human: 'meshitero',
    name_for_model: 'meshitero',
    description_for_human: 'Meshitero Plugin',
    description_for_model:
      'This plugin is a food-terrorism plugin that shows hungry users the pictures specified in the tag.',
    auth: {
      type: 'none'
    },
    api: {
      type: 'openapi',
      url: `${baseURL}/openapi.json`
    },
    logo_url: 'https://ss.yusukebe.com/4203deb97493d70346bfff59b02d0f769467c29df64c072bc947d4a55a495dec_800x636.png',
    contact_email: 'support@example.com',
    legal_info_url: 'https://example.com/legal'
  }
}
routes.ts
import { z, createRoute } from '@hono/zod-openapi'

export const schema = z.object({
  id: z.string(),
  tag: z.string(),
  created_at: z.string(),
  url: z.string()
})

const paramSchema = z.object({
  tag: z.enum(['肉', 'ラーメン'])
})

const routeRandom = createRoute({
  method: 'get',
  path: '/random',
  request: {
    query: paramSchema
  },
  operationId: 'random',
  summary: 'Get a random niku info',
  responses: {
    '200': {
      description: 'OK',
      content: {
        'application/json': {
          schema: schema
        }
      }
    }
  }
})

export { routeRandom }
index.ts
import { OpenAPIHono, z } from '@hono/zod-openapi'
import { cors } from 'hono/cors'
import { aiPluginJson } from './ai-plugin'
import { routeRandom, schema } from './routes'

const app = new OpenAPIHono()
app.use('*', cors())

const apiBaseURL = 'https://image-tag.yusukebe.workers.dev'
const baseURL = 'http://localhost:8787'

app.openapi(routeRandom, async (c) => {
  const url = new URL(`${apiBaseURL}/api/random`)
  const { tag } = c.req.valid('query')
  url.searchParams.set('tag', tag)
  console.log(`Request to ${url.toString()}`)
  const resRandom = await fetch(url.toString())
  const images = await resRandom.json<z.infer<typeof schema>[]>()
  const data = images[0]
  data.url = `https://image-tag.yusukebe.workers.dev/file/${data.id}`
  return c.jsonT(data)
})

app.get('/.well-known/ai-plugin.json', (c) => {
  return c.json(aiPluginJson(baseURL))
})

app.doc('/openapi.json', {
  openapi: '3.0.1',
  info: {
    title: 'Meshitero',
    description: 'This plugin is a food-terrorism plugin that shows hungry users the pictures specified in the tag.',
    version: 'v1'
  },
  servers: [
    {
      url: baseURL
    }
  ]
})

export default app
消す
つくったものを消しておく
9. Honoをより深く使う
9.1 他のランタイムで動かしてみよう
- aws-lambda
- bun
- cloudflare-pages
- cloudflare-workers
- deno
- fastly
- lagon
- lambda-edge
- netlify
- nextjs
- nodejs
- vercel
9.2 大きなアプリケーションの構成
app.route()で繋いでいく
9.3 アダプトとマウント
app.mount()
- アダプターの他にマウントという概念
fetchAPIならどんなアプリもマウントできる
// Create itty-router application
const ittyRouter = IttyRouter()

// Handle `GET /itty-router/hello`
ittyRouter.get('/hello', () => new Response('Hello from itty-router!'))

// Hono application
const app = new Hono()

// Hono application
app.mount('/itty-router', ittyRouter.handle)
Honoはランタイムにアダプトし、フレームワークをマウントする

フレームワークAは各ランタイムへのアダプターを作りがち

フレームワークAを各種ランタイムに対応させたければ、Hono上で動けばよい

マウントすることでHonoのミドルウェアが使える
app.use('/another-app/admin/*', basicAuth({ username, password }))
10. その他
- Bindingsのテストについて
- Vite plugins
- Sonikについて
おまけ. この資料もWorkersでできてる
これだけで、MarkdownをHTMLにするやつを作れて、デプロイ、配信までできてしまう
import { Hono } from 'hono'
import { marked } from 'marked'
import { rendererMiddleware } from './renderer'
import index from '../pages/index.md'

const app = new Hono()
app.get('*', rendererMiddleware)

app.get('/', (c) =>
  c.render(marked(index), {
    title: 'Cloudflare Workers + Hono Workshop'
  })
)
種明かし
- Markdownをモジュールとして読み込む
- MarkedでHTMLにする
- オリジナルの
rendererを定義しておく - HTMLを受け取りレイアウトに埋め込み
- タイトル、URL、イメージなどを受け取りメタタグ、OGPにセット
favicon.icoも配信- Workersでデプロイ
- 全部バンドルされちゃうので、Markdownのテキストが多くなるとサイズが大きくなる
